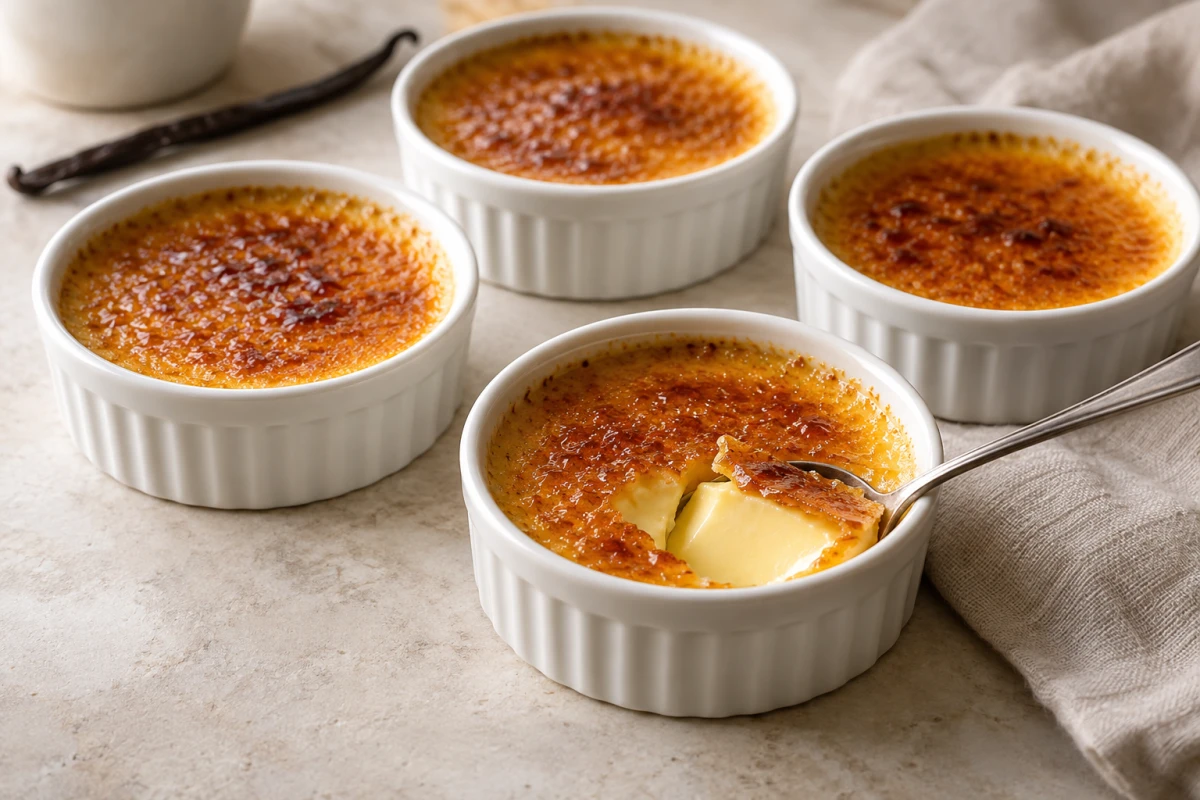
Classic Vanilla Crème Brûlée
Silky vanilla custard beneath a crisp caramel crust
A vanilla custard gently baked in a water bath is chilled completely, then topped with a thin, crisp caramel layer immediately before serving. Controlled temperatures, minimal air in the egg mixture, and sufficient chilling create a smooth, silky custard without bubbles or curdled edges.
- Prep time
- 15 minutes
- Cook time
- 45 minutes
- Rest time
- 4 hr 35 min
- Total
- 5 hr 35 min
- Yield
- 4 approximately 150 ml ramekins of crème brûlée, 4 dessert servings
Ingredients
- 500 ml Schlagsahne, mindestens 30 % Fett
- 1 Vanilleschote
- 5 Eigelb (Größe M; zusammen ca. 90 g)
- 70 g feiner weißer Zucker für die Creme
- 1 Prise feines Salz
- 40 g feiner weißer Zucker für die Karamellkruste
Instructions
- Preheat the oven to 150°C conventional or 130°C fan. Set four shallow ovenproof ramekins, each holding approximately 150 ml, in a roasting pan at least 5 cm deep. Bring about 1.5 liters water to a boil in a kettle.
- Split the vanilla bean lengthwise and scrape out the seeds. Heat the cream, vanilla seeds, and scraped pod in a small saucepan over medium heat, stirring occasionally, to 80–85°C; the cream should steam strongly but must not boil. Remove from the heat and infuse for 5 minutes.
- While the cream infuses, slowly whisk the egg yolks, 70 g sugar, and salt in a heatproof bowl for 60–90 seconds, until the sugar is moistened and the mixture homogeneous. Do not whip until pale or foamy because incorporated air creates bubbles.
- Remove the vanilla pod from the cream. Add the hot cream to the yolk mixture in three small additions while stirring slowly and continuously, then incorporate the remainder in a thin stream. Pour through a fine sieve into a measuring jug. Remove all surface foam with a spoon.
- Divide the custard evenly among the four ramekins, about 140 ml each. Place the roasting pan on the middle oven shelf. Carefully pour boiling water into the pan until it reaches halfway up the outside of the ramekins; do not let water enter the custard.
- Bake the custards for 30–35 minutes. They are ready when the outer 2 cm are set, the center still moves as one piece like soft jelly when gently nudged, and a clean thermometer in the center reads 80–82°C. Do not bake until the center is firm or puffed.
- Using heatproof gloves, lift each ramekin from the water bath and set it on a rack. Cool uncovered at room temperature for 30 minutes. Cover without touching the custard surface, then chill completely at no more than 5°C for at least 4 hours.
- Immediately before serving, gently blot any condensation from the surface. Spread 10 g crust sugar in a very thin, even layer over each portion. Set one ramekin at a time on a heatproof, nonflammable surface and caramelize the sugar with a kitchen torch kept constantly moving, until fully melted and amber. Point the torch away from your body and combustible objects.
- Leave the caramel crust uncovered at room temperature for 5 minutes to harden. Serve at once without berries, cream, or other unlisted garnishes; the crust should crack cleanly when tapped while the custard beneath remains cold and silky.
Tips
- Wide, shallow ramekins provide the best ratio of cold custard to thin caramel crust; all four ramekins must be the same size.
- Stir the yolks and sugar slowly only until homogeneous. Foam and air bubbles create a pitted rather than mirror-smooth surface.
- The water bath must reach halfway up the outside of the ramekins but must never enter the custard.
- Judge doneness by texture and a core temperature of 80–82°C, not by minutes alone; the custard continues to cook slightly as it cools.
- Caramelize the sugar only just before serving. The crust absorbs moisture and softens in the refrigerator.
Common mistakes
- Sahne sprudelnd kochen → nur auf 80–85 °C erhitzen, bis sie kräftig dampft.
- Eigelbmasse schaumig schlagen → langsam homogen rühren und Oberflächenschaum nach dem Sieben entfernen.
- Heiße Sahne auf einmal zum Eigelb gießen → zuerst in kleinen Portionen temperieren, damit das Ei nicht gerinnt.
- Kaltes oder zu wenig Wasser für das Wasserbad verwenden → kochendes Wasser bis zur halben Förmchenhöhe angießen.
- Bis zu einer vollständig festen Mitte backen → bei geleeartigem Zittern und 80–82 °C herausnehmen.
- Warme Creme abdecken oder früh karamellisieren → erst 30 Minuten offen abkühlen, mindestens 4 Stunden kühlen und Zucker erst vor dem Servieren brennen.
- Eine dicke Zuckerschicht auftragen → exakt 10 g je Portion sehr dünn verteilen, sonst wird die Kruste hart und bitter.
Variations and substitutions
- Vanilleschote: durch 10 g Vanillepaste ersetzen und zusammen mit der Sahne erhitzen; Süße und sichtbare Vanillepunkte können sich produktabhängig ändern.
- Vanilleextrakt: 10 ml nach dem fünfminütigen Aromatisieren in die vom Herd gezogene Sahne rühren; keinen alkoholhaltigen Extrakt direkt über offener Flamme verwenden.
- Feiner weißer Zucker für die Kruste: durch dieselbe Menge sehr feinen Rohrohrzucker ersetzen; er karamellisiert dunkler und muss besonders aufmerksam gebrannt werden.
- Vier 150-ml-Förmchen: durch sechs gleich große 100-ml-Förmchen ersetzen. `servings`, Yield, Schema-Portion und Nährwertangabe müssen dann auf 6 angepasst werden; ab 24 Minuten die Garprobe beginnen.
- Eine pflanzliche Sahnealternative wird nicht als direkte Substitution empfohlen, da Fett-, Eiweiß- und Stabilisatorgehalt die Gerinnung und Textur deutlich verändern.
Storage and notes
Storage
Rohe Eier durchgehend gekühlt halten, sauber trennen und nur unbeschädigte, frische Eier verwenden. Unkaramellisierte, vollständig gekühlte Cremes luftdicht abgedeckt bei höchstens 5 °C bis zu 2 Tage lagern. Zucker immer erst vor dem Servieren karamellisieren; bereits gebrannte Crème brûlée idealerweise innerhalb von 30 Minuten essen, da die Kruste im Kühlschrank weich wird. Reste höchstens 2 Stunden bei Raumtemperatur stehen lassen und wegen Qualitäts- und Sicherheitsverlust nicht erneut lagern, wenn bereits davon gegessen wurde. Nicht einfrieren. Küchenbrenner nur auf einer hitzefesten, nicht brennbaren Fläche, mit Abstand zu Tüchern, Alkohol und Verpackungen verwenden.
Allergens
Enthält Milch und Ei. Das Grundrezept enthält kein Gluten und keine Schalenfrüchte; Vanilleprodukte und Zucker müssen bei medizinisch relevanter Unverträglichkeit dennoch auf Kreuzkontamination geprüft werden. Ersatzprodukte können das Allergenprofil verändern.
Editorial context
This presentation and its supporting notes were edited for Rezepte daheim. It does not claim invention of the dish.
No personal kitchen test is currently documented for this version.